Tired of beautiful landscape lighting projects failing quickly? The constant replacements are frustrating and costly. Here's how to ensure your lights last for years, not just months.
Most landscape lights fail due to water ingress1, poor-quality wiring, and subpar materials. Choosing fixtures with at least an IP67 rating2, using professional waterproof connectors3, and selecting durable materials like die-cast aluminum4 are crucial steps to prevent premature failure and ensure longevity.
I've seen it happen too many times. A stunning lighting design looks incredible for a few months, then starts flickering and failing. It's a common story, but it doesn't have to be yours. Understanding the real reasons behind these failures is the first step to building a lighting system that lasts. Let's dig into the details.
Is Water Ingress the Biggest Killer of Your Outdoor Lights?
You installed "waterproof" lights, but they still failed from moisture. This hidden enemy gets inside even sealed units. I'll show you the main culprit and how to stop it.
Yes, water ingress1 is the primary cause of failure. Lights heat up and cool down, creating a "breathing effect" that sucks in moist air. Without proper seals (IP67+), waterproof vents, and internal potting, condensation forms inside, shorting out electronics and causing corrosion.
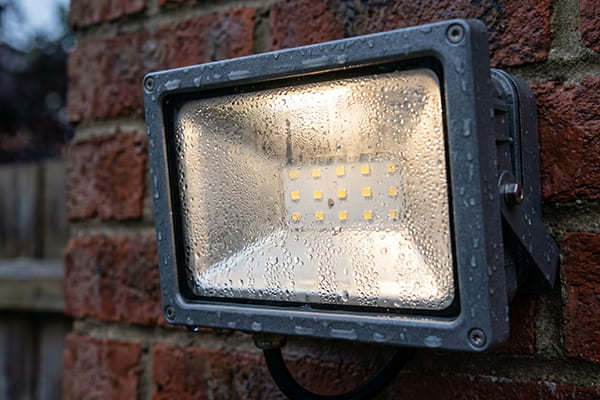
Every time a light turns on, it gets hot. When it turns off, it cools down. This temperature change causes the air pressure inside the fixture to drop, creating a vacuum. This vacuum pulls in the surrounding air, which is often damp, especially at night or after it rains. We call this the "breathing effect." A cheap light with a basic seal, like an IP65 rating, can't handle this constant pressure cycle. Over time, moisture builds up inside the lamp. You might even see condensation on the inside of the lens. This water is a death sentence for the electronics. It causes short circuits, corrodes the LED chip5, and destroys the driver. To truly waterproof a fixture, you need more than just a good gasket.
Understanding IP Ratings and Key Solutions
The best fixtures are designed to manage this "breathing" and provide multiple layers of protection. Simple seals are not enough for a product that lives outdoors for years.
| Feature | Problem It Solves | Why It's Essential |
|---|---|---|
| IP67+ Rating | Prevents dust and temporary water immersion. | An IP65 rating only protects against water jets. IP67 ensures survival in puddles and heavy downpours. |
| Waterproof Vent | Manages internal pressure from the "breathing effect". | It allows air to pass but blocks larger water molecules. This stops the fixture from sucking in moisture. |
| Internal Potting | Fully encases electronics in waterproof epoxy resin. | This is the final line of defense. It creates a solid, waterproof block around the driver and LED chip5. |
Could Poor Wiring and Electrical Issues Be Sabotaging Your Project?
Your lights are high-quality, but they're still failing. The problem might be hiding in your connections and wiring. Let's uncover these silent saboteurs that ruin good installations.
Absolutely. An estimated 90% of outdoor lighting failures happen at the connection point. Using simple electrical tape or cheap connectors is a recipe for disaster. Corrosion from soil moisture, voltage drop6 over long wire runs, and power surges will quickly destroy your fixtures.

I always say that a lighting system is only as strong as its weakest link. In outdoor lighting, that weak link is almost always the wire connection. Many installers simply twist wires together and wrap them in electrical tape. This is a huge mistake. Soil is damp, and that moisture will get past the tape. It then starts a process called electrochemical corrosion7, which eats away at the copper wires until the connection fails. Similarly, cheap clip-on connectors are not truly waterproof and will fail the same way. Beyond the connection itself, you have to think about the entire electrical plan8. If your wire run is too long, the voltage will drop, and the lights at the end of the line will be dim or flicker. An undersized transformer9 will overheat and burn out. These are not fixture problems; they are planning and installation problems.
Building a Robust Electrical Foundation
A durable lighting system requires a solid electrical plan8 from the start. Don't let your investment in quality fixtures be ruined by poor wiring practices.
| Component | What to Do | The Impact |
|---|---|---|
| Connectors | Use professional waterproof connectors3. These can be heat-shrink tubes or gel-filled connectors. | This completely seals the connection from moisture, stops corrosion, and ensures a reliable flow of power. |
| Wiring | Bury cables at least 15cm deep. Use the correct wire gauge to prevent voltage drop6 over long distances. | It protects wires from damage from shovels or garden tools and ensures all lights get the power they need. |
| Transformer | Choose a transformer9 with 20-30% more power capacity than your total light wattage. | This prevents the transformer9 from being overworked and failing. It also provides room to add more lights later. |
| Surge Protector | Install surge protection for the lighting system. | It protects the sensitive LED drivers from voltage spikes caused by lightning or power grid issues. |
Are Cheap Materials a False Economy for Landscape Lighting?
Low-priced lights seem like a great deal initially. But they quickly rust, crack, and fade, forcing expensive replacements. I'll explain why investing in quality materials10 saves you money.
Yes, cheap materials are a major pitfall. Fixtures made from thin aluminum, recycled plastic, or low-grade components cannot withstand the elements. They corrode, crack under UV exposure, and have poor heat dissipation11, which drastically shortens the life of the LED and driver.
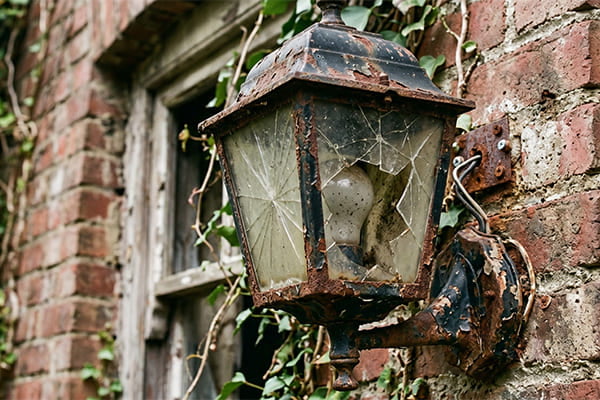
I have a client in Iraq who is a perfect example of this. He bought our linear wall washer lights back in 2019. In early 2025, he told me that almost none of the lights have failed. He faces intense competition from local suppliers selling much cheaper lights. But he also told me that those new, cheap installations start having major problems within a year. His project, now over five years old, still looks great. This is why material choice is so important. Cheap lights often use thin, stamped aluminum or even plastic for the housing. These materials rust, become brittle from sun exposure, and crack easily. More importantly, they are terrible at dissipating heat. Heat is the enemy of an LED. If a fixture can't get rid of heat, the LED chip5 and the driver will burn out quickly. This is why our lights were still running perfectly after five years in the Iraqi heat.
Material Quality: The Long-Term Investment
When you select a fixture, you are choosing a product that has to survive outdoors 24/7. The materials used for the housing, the LED, and the driver will determine if it lasts one year or ten.
| Component | The Cheap Option | The Quality Option | Why It Matters |
|---|---|---|---|
| Housing | Thin stamped aluminum or basic plastic. | Thick die-cast aluminum4, solid brass, or 304/316 stainless steel. | Provides durability, corrosion resistance, and acts as a heat sink to pull heat away from the electronics. |
| LED Chip | Unbranded, low-efficiency chips. | Reputable brands like Cree or Osram. | Ensures stable light output, good color consistency, and a very slow decline in brightness over many years. |
| Driver | A basic, non-isolated driver with no protection. | A high-quality, isolated driver with thermal and surge protection. | The driver provides stable power. A good one protects the LED from electrical fluctuations and heat. |
How Can Proper Installation and Maintenance Extend Your Light's Lifespan?
You bought the best lights, but they are still underperforming. The way they were installed and maintained could be the problem. Let’s look at simple steps to guarantee longevity.
Proper installation and maintenance are non-negotiable. Lights should be installed slightly above ground to avoid being buried or submerged. They must be kept clear of sprinkler spray12 and overgrown plants. Regular cleaning every six months prevents overheating and ensures consistent light output.
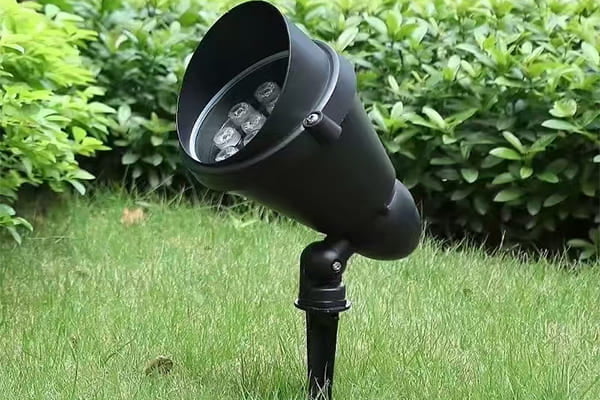
Even the best-made fixture in the world will fail if it's installed incorrectly. I've seen expensive lights buried in mulch, where they sit in a pool of water every time it rains. I've seen them placed right in the path of a sprinkler head, getting blasted with high-pressure water daily. Both of these situations will lead to premature failure. Another common issue is heat. The fins you see on the back of a wall washer or floodlight are there for cooling. If you let bushes grow over them or if they get covered in leaves and dirt, the light can't cool itself. It will overheat and its lifespan will be dramatically reduced. A little bit of planning during installation and a simple maintenance routine13 make all the difference. For example, choosing fixtures with a replaceable light source14, like an MR16 socket, can also make future maintenance much cheaper and easier.
Your Installation and Maintenance Checklist
Follow these simple rules to ensure your lighting project stands the test of time. A great installation protects your investment.
| Action | Frequency | Reason |
|---|---|---|
| Installation | ||
| Position Above Ground | Once, during installation. | Prevents the fixture from being buried by debris or sitting in puddles, reducing water risk. |
| Avoid Sprinkler Heads | Once, during installation. | Direct, high-pressure spray can overwhelm seals over time and force water into the fixture. |
| Ensure Airflow | Once, during installation. | Don't crowd fixtures with plants. They need clear space for air to circulate and cool the fixture. |
| Maintenance | ||
| Clean Lenses & Housing | Every 6 months. | Removes dirt and hard water spots that block light and can trap heat, causing the unit to run hotter. |
| Clear Vegetation | Every 6 months. | Ensures heat sinks are not blocked by leaves or growing plants, allowing for proper cooling. |
| Check Seals | Annually. | Inspect rubber gaskets for cracking or brittleness. Replace them if they look worn out. |
Conclusion
Choosing quality IP67 fixtures, using waterproof connectors3, and following proper installation15 practices are the keys. This is how you build a landscape lighting system16 that lasts for a decade.
Understanding water ingress is crucial for preventing outdoor lighting failures and ensuring longevity. ↩
Learn how an IP67 rating protects your outdoor lights from moisture and dust, ensuring durability. ↩
Explore the benefits of using waterproof connectors to prevent corrosion and ensure reliable connections. ↩
Explore why die-cast aluminum is a superior material choice for outdoor lighting fixtures. ↩
Choosing the right LED chip ensures stable light output and longevity for your outdoor lighting. ↩
Understanding voltage drop is essential for maintaining consistent light output in your outdoor lighting. ↩
Discover how electrochemical corrosion can damage your outdoor lighting and how to prevent it. ↩
A well-thought-out electrical plan is essential for the reliability and efficiency of your lighting system. ↩
Choosing the right transformer is key to preventing failures and ensuring your lights operate efficiently. ↩
Investing in quality materials can save you money in the long run by reducing replacements. ↩
Understanding heat dissipation helps in selecting fixtures that will last longer and perform better. ↩
Avoiding sprinkler spray is crucial for maintaining the integrity of your outdoor lighting fixtures. ↩
Regular maintenance ensures your outdoor lighting remains functional and efficient over time. ↩
Fixtures with replaceable light sources make maintenance easier and more cost-effective. ↩
Proper installation is crucial for maximizing the lifespan and performance of your outdoor lighting. ↩
Learn the key components and practices for creating a landscape lighting system that lasts for years. ↩