Harsh, blinding lights ruining your beautiful pool and garden at night? That glare is not just ugly; it's a safety hazard.1 What if you could create a safe, luxurious glow?
The best practice for low-glare pool and step lighting is to hide the light source.2 Use recessed fixtures, downward-angled beams, and warm, dimmable light to illuminate the space beautifully and safely3, ensuring you see the light, not the blinding bulb.
This "see the light, not the lamp" philosophy sounds simple, but it makes all the difference. As a project partner at JUXUANLED, I've seen firsthand how getting this right transforms a space from jarring to magical. It's the core principle that separates an average lighting job from a truly high-end, architectural experience. Getting the light exactly where you need it, without any annoying glare, is the goal for every project we undertake. Let's break down exactly how you can achieve this sophisticated and safe effect.
How Can You Effectively Hide Light Sources?
Want that high-end, floating steps look? But exposed LED strips create distracting hot spots? There is a better way to conceal your lighting for a seamless, elegant effect.
Hide light sources by installing them strategically. For pools, use deep-recessed fixtures. For steps, embed light strips under the tread or use shielded lights in the riser. The goal is to keep the light source below your direct line of sight.

The most fundamental rule of low-glare design is to make the light source invisible. When you can't see the LED chip directly, you eliminate the primary source of glare.4 This requires careful planning of fixture selection and placement. For a project I recently consulted on, the client wanted their poolside to feel like a five-star resort. The key was embedding all the lighting so it became a natural part of the architecture, not an afterthought. We achieved this by focusing on two main areas.
Pool Lighting Concealment Techniques
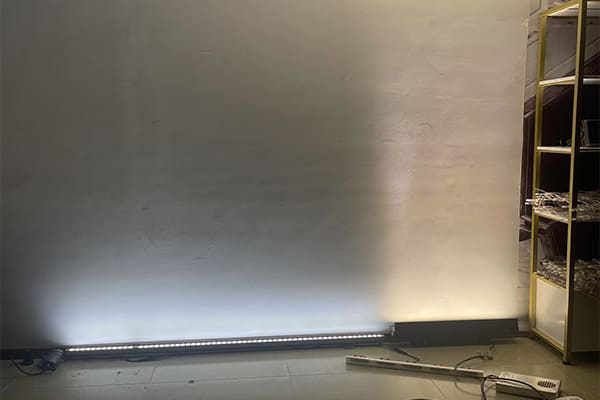
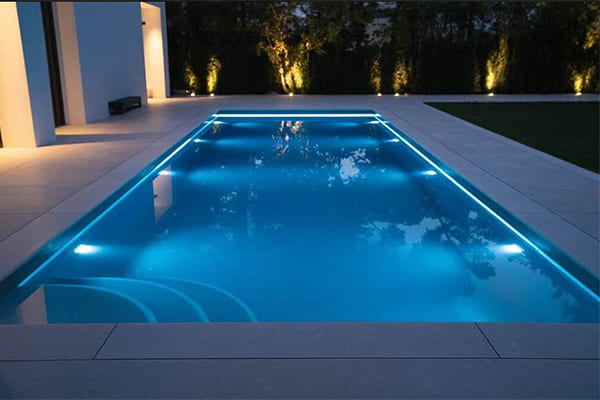
For pools, we always recommend fixtures with deep-recessed designs or honeycomb grilles5. These features physically block the light source from most viewing angles. Another fantastic technique is to install waterproof LED strips directly under the pool's coping stone. This casts a soft, indirect halo of light onto the water's surface, defining the pool's edge without any visible source. The light reflects gently off the water, creating a beautiful shimmer.
Step Lighting Concealment Methods
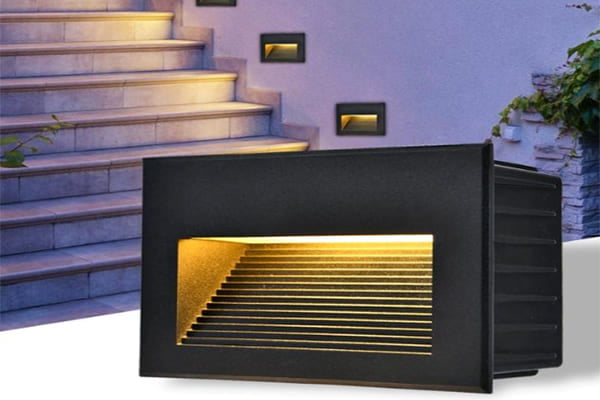
For steps, the strategy is similar. Installing a linear light strip on the underside of each step's "nose" or tread creates a stunning "floating" effect.6 The light is cast directly down onto the step below, safely illuminating the path. Another option is to use small, shielded wall lights embedded into the vertical face (the riser) of the step. These fixtures have a built-in shield or "eyelid" that directs all light downward, preventing it from shining up into anyone's eyes.
| Fixture Location | Best Practice | Why It Works |
|---|---|---|
| Pool Wall (Underwater) | Deep-recessed fixture | Hides the LED chip from direct view |
| Pool Coping | Under-coping LED strip | Creates a soft, indirect glow on the water |
| Step Tread | Under-tread LED strip | Illuminates the path with a "floating" look |
| Step Riser | Recessed, shielded light | Casts light down onto the step below |
What’s the Secret to Controlling Light Direction and Glare?
Frustrated by pool lights that shine right in your eyes? General floodlights create a flat, uninviting scene. You need precision to highlight the beauty of your space effectively.
The secret is precise control. Use fixtures with asymmetrical lens7es that direct light downward, typically at a 15°-35° angle. For pools, always point lights away from the main viewing areas to illuminate the far wall, not the viewer. This is key.
Hiding the lamp is half the battle; the other half is telling the light exactly where to go. Simply throwing light everywhere with a wide-beam floodlight is a common mistake.8 It creates a flat, washed-out look and almost always results in glare. True lighting design is about control and precision. In our projects, especially for large building facades or landscapes, we rely heavily on advanced optics to sculpt the light. The same principles apply perfectly to pools and steps, just on a smaller scale. You want to graze surfaces with light, not blast them head-on.
The Power of Asymmetrical Lenses
The real workhorse here is the asymmetrical lens. Unlike a standard symmetrical lens that produces a simple cone of light, an asymmetrical one shapes the beam, pushing it forward and down. We specify fixtures with lenses that create a 15° to 35° downward tilt. This ensures that the light beam goes onto the path or into the pool, not into the sky or your eyes.9 It’s a simple piece of engineering that makes a massive difference in user comfort and reduces wasteful light pollution.
The "Backing Principle" in Pool Design
For pools, we use what I call the "backing principle." This means the lights should always be aimed away from the primary viewing area. For example, if your main patio and seating area are on the west side of the pool, the lights on the west pool wall should point east, across the pool. This illuminates the far wall and the water, but people on the patio never look directly into a light source. This simple orientation trick is crucial for a comfortable, glare-free experience. Finally, always choose matte finishes for fixtures and surrounding materials like stone pavers. Polished surfaces create secondary, reflected glare from the water, undermining all your hard work.
Which Technical Specs Actually Matter for Safety and Ambiance?
Worried about fixtures failing or colors looking "off"? Choosing the wrong specs can be a costly mistake. Let’s focus on the numbers that guarantee performance and longevity.
Focus on these key specs: IP68 for underwater pool lights and IP65+ for steps. A Color Rendering Index (CRI) of Ra > 90 ensures true colors. For ambiance, choose a warm color temperature (2700K–3500K) and use a DMX512 system for dimming.
When our clients, who are often engineering contractors, evaluate products, they look past the marketing and straight to the spec sheet. For good reason. The technical specifications are the promise of performance. For something as critical as pool and step lighting, where safety and durability are paramount, you cannot afford to get it wrong. Getting these three areas right—durability, light quality, and control—is non-negotiable for a professional-grade installation that will last for years.
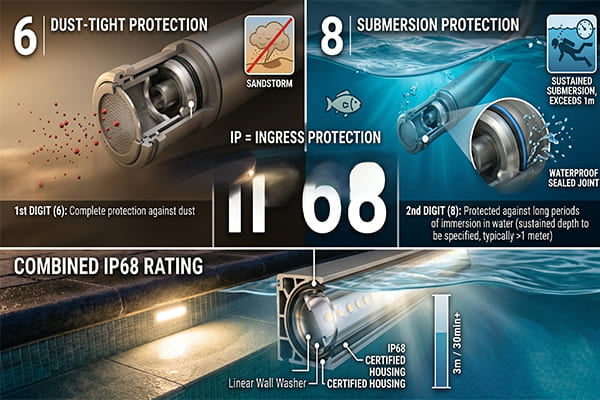
Decoding IP Ratings
The Ingress Protection (IP) rating is your guarantee against water and dust.10 For any light that will be fully submerged in a pool, IP68 is the absolute minimum.11 This means it's tested to be protected against continuous immersion in water. For steps and surrounding areas that will get splashed or hit by rain and sprinklers, you need at least IP65. This rating ensures the fixture is protected against water jets from any direction. It’s a simple number, but it’s your first line of defense against failure.
Why CRI and Color Temperature are Crucial
Light quality dramatically affects the look and feel of your space. Color Rendering Index (CRI) measures how accurately a light source reveals the true colors of objects.12 We always insist on a CRI of Ra > 90. This makes the pool water look crisp and blue, not murky, and brings out the natural beauty of stone and plants. For color temperature, we recommend a warm white light between 2700K and 3500K. This range creates a relaxing, inviting atmosphere, unlike harsh, cool-white light which can feel clinical and sterile.
The Advantage of Smart Dimming
Finally, control is everything. We often integrate our lighting into a DMX512 control system. This gives the owner complete control over the brightness. You can have the lights at 100% for a party, but then dim them down to a soft 20-30% glow for quiet evenings. This not only sets the perfect mood but also saves significant energy and reduces late-night light pollution, keeping neighbors happy.
How Do You Achieve Visual Balance and Avoid Harsh Contrast?
Is your pool a blindingly bright spot in a dark yard? This extreme contrast is the very definition of glare. You need to balance the light to create a cohesive, inviting scene.
Achieve visual balance through "layered lighting." Avoid one super-bright source. Aim for a brightness ratio of about 3:1 between the pool and its surroundings. Combine low-level step lights, accent pool lights, and soft ambient light for a complete, comfortable look.
Glare isn't just caused by seeing a bright bulb; it's also caused by extreme contrast between light and dark areas. Your eyes can't adjust properly, which causes discomfort. Imagine a single, intensely bright light in an otherwise pitch-black yard. It feels jarring. The solution is to create a gentle transition of light levels, connecting the different parts of your landscape into one cohesive view. We do this by building layers of light, much like a painter builds layers on a canvas. This approach moves beyond simple illumination and into the realm of true landscape design.
Understanding the 3:1 Brightness Ratio
A helpful rule of thumb for professionals is the 3:1 brightness ratio. This means your main feature—the pool—should be roughly three times brighter than its immediate surroundings, like the deck or patio. Those surroundings, in turn, should be brighter than the general landscape further out. This gradual step-down in brightness creates depth and dimension, guiding the eye smoothly through the scene instead of shocking it. It feels natural and comfortable, allowing you to appreciate the entire space.
Building Your Lighting Layers
We build the scene using three main layers of light. First is the task or safety layer, which includes the low-level, glare-free lights on steps and pathways. Their job is purely functional. The second is the accent layer, which highlights the main features. This is where your underwater pool lights come in, showing off the water's color and texture. Finally, we add an ambient layer. This is the soft, gentle light that fills in the shadows. We might achieve this by washing a nearby garden wall with a soft glow or using an uplight to create a "moonlight" effect through the branches of a tree. Together, these layers create a rich, visually interesting, and comfortable nighttime environment.
| Lighting Layer | Purpose | Fixture Examples |
|---|---|---|
| Task/Safety | Guide movement, prevent trips | Under-tread step lights, shielded path lights |
| Accent | Highlight key features | Underwater wall lights, lights on a water feature |
| Ambient | Soften contrast, create mood | Wall washers on a nearby wall, "moonlighting" |
Conclusion
Low-glare design isn’t about less light; it’s about controlled light. By hiding sources and layering light, you create a space that is both stunningly beautiful and perfectly safe.
"Nighttime Driving Evaluation of Disability and Discomfort Glare from ...", https://vtechworks.lib.vt.edu/handle/10919/36097. A lighting-safety source should support that glare can reduce visual performance and visibility, which can contribute to hazards in circulation areas; this contextual evidence does not quantify risk for this specific pool installation. Evidence role: general_support; source type: institution. Supports: Glare from outdoor lighting can create safety hazards by impairing visibility.. Scope note: Contextual support for glare as a safety concern, not direct proof of accident rates for pools and gardens. ↩
"[PDF] Introduction to Interior Lighting Design - OHIO Personal Websites", https://people.ohio.edu/ziff/ARTI%20288/Intro%20to%20Interior%20Lighting%20Design.pdf. A lighting-design reference should support that shielding or concealing luminaires reduces direct glare by limiting the viewer’s line of sight to the high-luminance source; the source may address outdoor or architectural lighting generally rather than pools specifically. Evidence role: mechanism; source type: institution. Supports: Concealing or shielding the light source is a recognized strategy for reducing glare.. Scope note: Likely supports the optical principle generally, not a pool-specific best-practice hierarchy. ↩
"[PDF] Campus Outdoor Lighting Plan | Dark Sky Truman", https://darksky.truman.edu/files/2025/03/Campus_SHINE_Draft_TSU_Lighting_Management_Plan.pdf. A professional lighting-design guide should substantiate that recessed or shielded fixtures, controlled downward distribution, warm color appearance, and dimming are common methods for improving visual comfort in exterior lighting; such evidence would support the design rationale rather than the aesthetic judgment of 'beautifully.' Evidence role: expert_consensus; source type: institution. Supports: Recessed fixtures, downward-directed beams, warm light, and dimming are accepted methods for comfortable exterior illumination.. Scope note: Supports visual-comfort and control principles, not subjective claims about beauty. ↩
"[PDF] Introduction to Interior Lighting Design - OHIO Personal Websites", https://people.ohio.edu/ziff/ARTI%20288/Intro%20to%20Interior%20Lighting%20Design.pdf. A lighting-science source should explain that direct glare is caused by high-luminance sources within the visual field, so obscuring the emitting LED package can reduce direct glare; this does not imply that all glare is eliminated because reflected glare may remain. Evidence role: mechanism; source type: education. Supports: Direct visibility of an LED source is a primary contributor to direct glare, and hiding it reduces that glare.. Scope note: The word 'eliminate' is stronger than most sources will support, because reflected or contrast glare can still occur. ↩
"Premium Honeycomb Louvers - Ironsmith Lighting Products", https://ironsmithlighting.com/collections/honeycomb-louvers?srsltid=AfmBOoq-eDrom6wCeIY62UaFfJsJ59srUY5HXcpqPQC-cGoOyzM8SszF. A luminaire-optics or lighting-design source should document that recessing a light source or using louvers/honeycomb baffles limits high-angle light and reduces direct view of the source; the support is general and may not evaluate the specific products described. Evidence role: mechanism; source type: institution. Supports: Deep recesses and honeycomb grilles can reduce direct glare by shielding the light source from many viewing angles.. Scope note: Supports the glare-control function of recesses and baffles generally, not the performance of any particular fixture. ↩
"[PDF] energy efficient landscape lighting - Department of Human Ecology", https://humanecology.ucdavis.edu/sites/g/files/dgvnsk161/files/inline-files/CGates.pdf. An architectural lighting reference should support that concealed linear lighting beneath stair nosings or treads is used to illuminate stair surfaces while concealing the source; descriptions of a 'floating' visual effect are design-contextual rather than objectively measurable. Evidence role: case_reference; source type: education. Supports: Under-tread linear lighting is an established architectural technique for concealed stair illumination.. Scope note: The source may support the concealed stair-lighting method more directly than the subjective aesthetic description. ↩
"Research on lighting quality optimization technology of ultra-wide ...", https://ui.adsabs.harvard.edu/abs/2025SPIE13575E..2AZ/abstract. A lighting-engineering source should define asymmetrical light distribution and explain that such optics direct luminous intensity preferentially in one direction rather than forming a symmetric beam; it may not prescribe the exact application to pools. Evidence role: definition; source type: education. Supports: Asymmetrical lenses shape light distribution directionally rather than producing a uniform symmetrical cone.. Scope note: Supports the optical definition, not the full design recommendation for pool placement. ↩
"[PDF] Outdoor Lighting - California Energy Commission", https://www.energy.ca.gov/sites/default/files/2025-07/06_OutdoorLighting_ada.pdf. A dark-sky or outdoor-lighting guidance source should support that uncontrolled broad-beam luminaires can cause glare, light trespass, and inefficient spill light; the evidence would substantiate the technical problem rather than prove how common the mistake is. Evidence role: expert_consensus; source type: institution. Supports: Uncontrolled wide-beam floodlighting can create glare and spill light in outdoor settings.. Scope note: Likely supports the drawback of uncontrolled floodlighting, not the frequency implied by 'common.' ↩
"DarkSky Approved", https://darksky.org/what-we-do/darksky-approved/. A light-pollution or exterior-lighting standard should support that downward-directed and shielded luminaires reduce uplight and direct glare by controlling emission angles; the citation would not verify that every 15°–35° beam angle performs this way in every installation. Evidence role: mechanism; source type: institution. Supports: Downward-directed beam control helps keep light on the intended surface and reduces glare and uplight.. Scope note: Supports the principle of downward-directed light, not the universal sufficiency of the stated angle range. ↩
"IP code - Wikipedia", https://en.wikipedia.org/wiki/IP_code. An IEC or standards-oriented source should explain that IP codes classify degrees of protection provided by enclosures against solid objects and water ingress; the term 'guarantee' should be read as a standardized rating, not an absolute warranty against failure. Evidence role: definition; source type: institution. Supports: Ingress Protection ratings describe enclosure resistance to dust and water ingress.. Scope note: IP ratings classify tested protection levels but do not guarantee performance under all installation, aging, or maintenance conditions. ↩
"Ingress Protection (IP) ratings - IEC", https://www.iec.ch/ip-ratings. A standards or certification reference should support that the second digit 8 in an IP68 rating denotes protection against continuous immersion under conditions specified by the manufacturer; it should also clarify that pool installations may require additional electrical-safety compliance beyond the IP rating. Evidence role: definition; source type: institution. Supports: IP68 is the relevant IP classification for equipment intended for continuous immersion.. Scope note: IP68 addresses ingress protection, not all electrical safety requirements for underwater pool lighting. ↩
"Color rendering of light sources | NIST", https://www.nist.gov/pml/sensor-science/optical-radiation/color-rendering-light-sources. A standards or educational source should define the Color Rendering Index as a measure of how a light source renders object colors relative to a reference illuminant; the phrase 'true colors' is a simplified description rather than a complete color-science definition. Evidence role: definition; source type: institution. Supports: CRI is a metric for the color-rendering ability of a light source compared with a reference.. Scope note: CRI is an established but limited metric and does not fully characterize all aspects of color quality, especially for some LED spectra. ↩