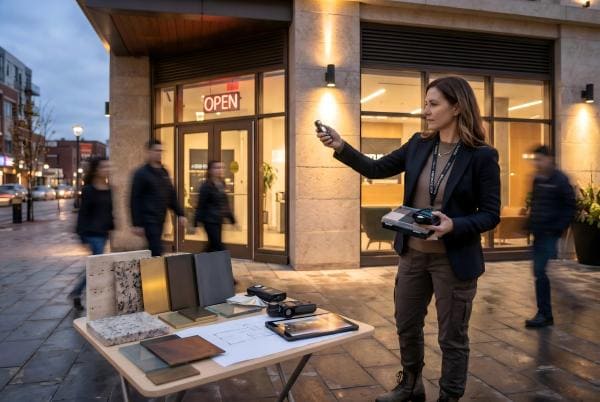
Struggling to make your building's facade stand out? Generic lighting often creates harsh glare and ugly hotspots. Precision is the key to creating stunning, high-end architectural lighting effects.
The secret is to scientifically match the beam angle and wattage of your light fixtures1. This allows you to achieve a "see the light, not the lamp" aesthetic, avoiding common issues like light pollution and glare2 while perfectly highlighting your building's features.
I've been in the lighting business for over a decade, and I've seen it all. The most common mistake I see project managers make is thinking that more power is always better. They install high-wattage floodlights everywhere, hoping to make a statement. Instead, they create a light-polluted mess that washes out architectural details and blinds passersby. The truth is, world-class lighting design isn't about brute force. It's about surgical precision. It's an art and a science, and when you get it right, the results are breathtaking. In this guide, I'll walk you through the exact principles we use at JUXUANLED to help our clients create custom lighting that looks amazing and performs efficiently.
How Do You Choose the Right Beam Angle for Your Building?
Your building's unique features are lost in a flat, uniform wash of light. Standard fixtures fail to create depth or drama. You need to direct light exactly where it's needed.
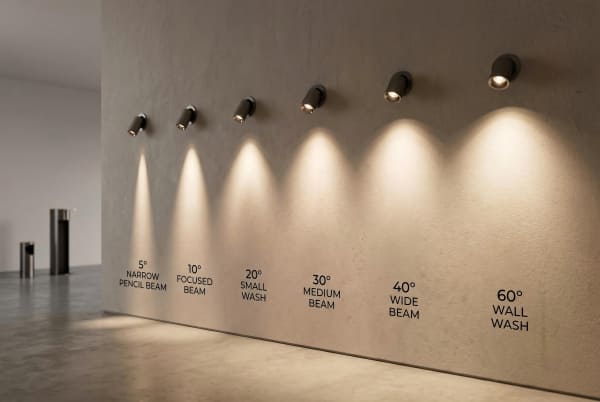
Select narrow angles (4°-15°) for tall columns, medium angles (20°-35°) for general surfaces, and wide angles (45°+) for smooth wall washing.3 This tailored approach ensures the light sculpts your architecture instead of just flooding it.
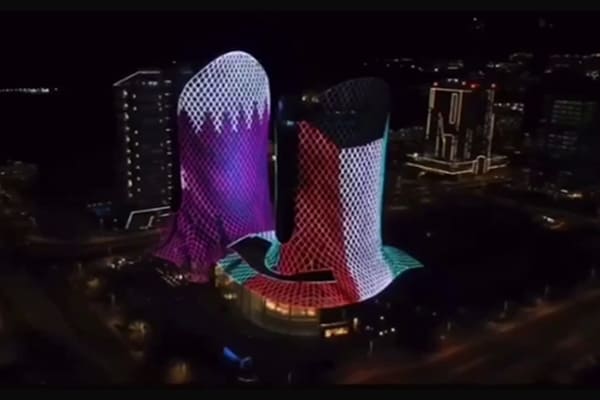
I remember working on a project for a new high-rise hotel. The architect wanted to emphasize the building's incredible height and the sharp vertical lines running up its facade. The initial proposal from another company suggested using standard wide-beam floodlights. We knew that would just flatten the look. Instead, we proposed a strategy using very narrow beam angles. It took some convincing, but once we showed them the design simulation, they were sold. The right beam angle is everything.
The Power of Narrow Beams (4°-15°)
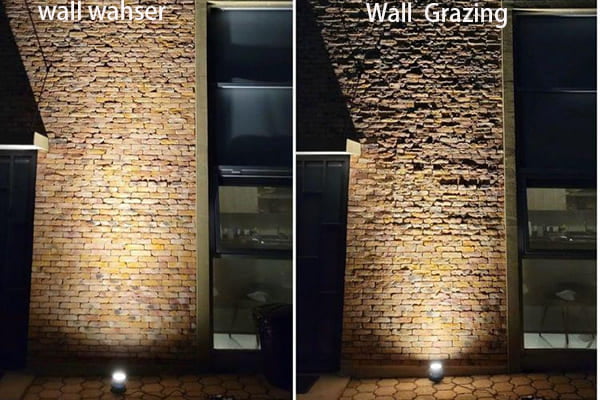
Narrow beams are the snipers of the lighting world. They concentrate light into a very tight, powerful punch. This makes them perfect for tall architectural elements. Think about illuminating structural columns on a skyscraper or creating dramatic streaks of light on an ultra-tall curtain wall. We often use a technique called wall grazing4, where we install these narrow-beam fixtures very close to the surface. This technique highlights the texture of the material, whether it's stone, brick, or concrete, and creates a beautiful, dramatic effect of vertical light. It's how you make a 20-story building feel like it's touching the sky.
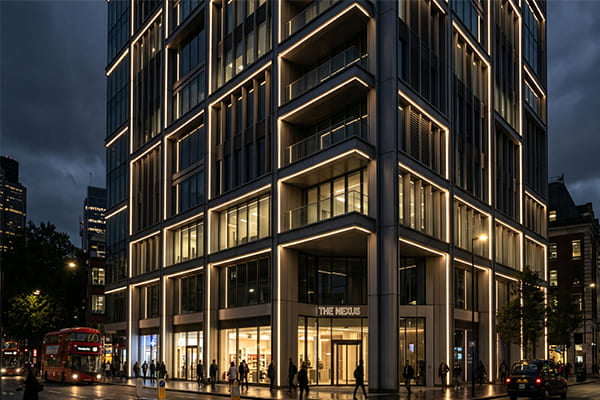
The Versatility of Medium Beams (20°-35°)
This is your workhorse range. Medium beam angles provide a great balance between light intensity and coverage area. They are the most common choice for a reason. They work wonderfully for illuminating mid-height walls, building logos, or specific architectural sections without creating harsh edges. The light from a medium beam has a softer transition, so the light spots blend more naturally. This prevents the facade from looking patchy or disconnected. For most general facade lighting applications where you need good, solid illumination without extreme drama, this is the angle range I start with.
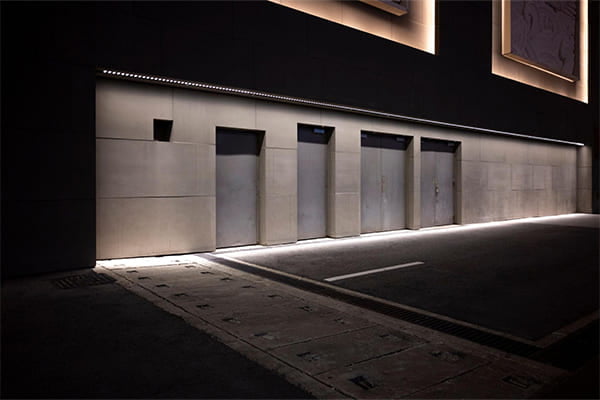
The Smoothness of Wide Beams (45°-60°+)
When you want a smooth, even sheet of light, you need a wide beam angle. This is the go-to choice for wall washing5. The goal here is to make a wall look like a clean, bright canvas. This technique is fantastic for hiding minor imperfections on a wall's surface and creating a sense of clean, expansive space. The wide distribution of light washes the entire area uniformly. We use this for large, plain facades or lower sections of a building to create a solid, glowing foundation for the more detailed lighting above.
How Do You Match Wattage to Illumination Height?
Are your lights too weak for your tall building or painfully bright for a low wall? Mismatched power wastes energy and ruins the visual effect. You need a more calculated approach.
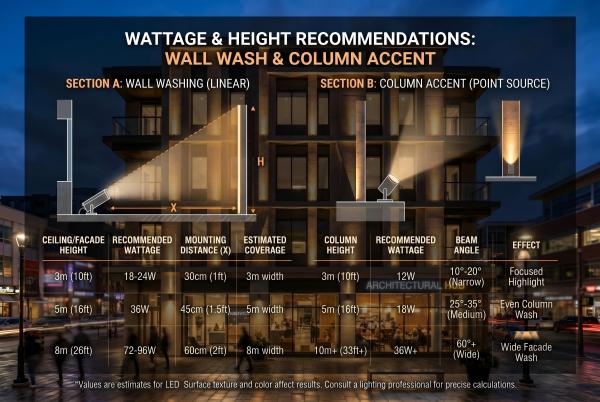
Use low wattage (3-9W) for short distances up to 3 meters and high wattage (72W+) for structures over 15 meters.6 Matching the power to the required illumination height is essential for both visual impact and energy efficiency.
A few years ago, we were called in to consult on a project for a municipal government building. They had already installed the lights themselves, and the result was terrible. The lights at the base of the 3-meter walls were so powerful they created blinding glare, while the lights aimed at the 10-meter clock tower were too weak to even reach the top. They were wasting so much electricity and the building looked awful. We came in, recalculated the wattage needed for each section based on its height, and replaced the fixtures. The difference was night and day, and we cut their lighting energy bill by over 40%7.
A Practical Guide to Power and Height
Getting the power right is a straightforward process once you know the rules. You don't need a 72W cannon to light up a garden wall, and a 9W fixture won't do much on a 20-meter facade. Here is the simple table we use as a starting point for our projects. It's a reliable guide that helps us ensure every part of a building is lit appropriately.
| Illumination Height | Recommended Beam Angle | Suggested Wattage |
|---|---|---|
| 1-3 meters | 30°-45° | 3-9W |
| 3-8 meters | 15°-30° | 12-24W |
| 8-15 meters | 8°-15° | 36-54W |
| 15+ meters | 4°-8° | 72W+ |
This table directly links the three most important variables: how far the light needs to travel (height), how wide it needs to spread (beam angle), and how much power it needs to get there (wattage). You can see that as the height increases, the beam angle gets narrower and the wattage goes up8. This is because you need to concentrate more light energy into a tighter beam to push it further up the building effectively. Following this simple logic prevents energy waste and ensures a balanced, professional lighting scheme.
What Other Factors Influence Custom Lighting Design?
You've picked the angle and wattage, but the result still looks off. Hidden variables can sabotage a good lighting plan. The fixture itself is only part of the equation.
You must also analyze the building material's reflectivity, the fixture's installation distance, the surrounding ambient light, and potential glare. A dark, rough wall, for example, might need 50% more power to look right.9
I learned this lesson the hard way on a project in Southeast Asia. We designed the lighting based on architectural drawings. On paper, it was perfect. But when we got to the site, we realized the "light gray" stone specified in the plans was actually a much darker, porous volcanic rock. Our initial power calculations were way too low. The light was just getting swallowed by the material. We had to quickly re-specify higher-wattage fixtures and adjust our plan. Now, analyzing these external factors is the first thing we do.
Key Customization Factors to Master
A great lighting designer thinks like a detective, looking for clues beyond just the building's height. Here are the critical factors we always evaluate.
- Material Reflectivity: Different surfaces react to light differently. A smooth, white, painted surface reflects a lot of light, so you can use lower wattage. A dark, rough brick or stone surface absorbs light. For these materials, I often increase the calculated wattage by 30-50% to achieve the same perceived brightness.
- Installation Distance: How close is the light to the wall? If you are mounting fixtures right up against the wall for a grazing effect, you need special optics. We often use asymmetrical lenses10 that direct the light sideways and upwards, preventing a bright "hotspot" at the base of the wall and ensuring the light spreads evenly up the facade.
- Ambient Light Analysis: Is your building in a dark, rural area or a brightly lit downtown core like Times Square? If you're competing with bright streetlights, digital billboards, and light from other buildings, you will need to increase the wattage and contrast of your lighting scheme to make it stand out.
- Glare Control: Good lighting is about seeing the effect, not the source. Glare is the enemy. We always consider the viewing angles of pedestrians and people in nearby buildings. We use accessories like anti-glare louvers, shields, or visors11 to cut off any stray light that could cause discomfort. This is a crucial step for professional, high-quality lighting.
Why is Optical Control More Important Than High Wattage?
Many people still believe that more power equals better light. This thinking leads to glaring, inefficient designs that waste energy. There is a much smarter way to create powerful visual impact.
Always prioritize advanced optical control over raw wattage. A precisely engineered 18W fixture with superior optics will create a far better visual effect than a cheap, glaring 54W fixture with poor light control.
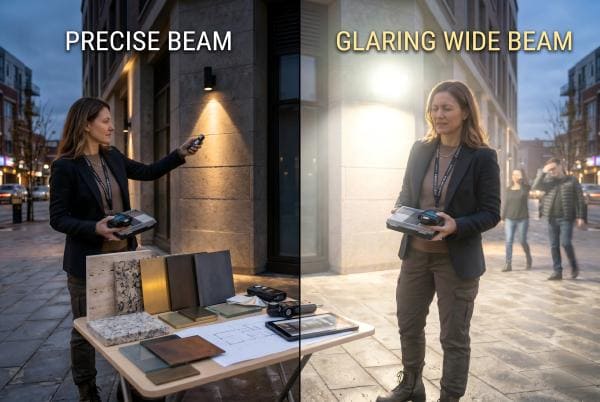
On a recent competitive bid for a landmark bridge project, our competitor proposed a solution using generic 100W floodlights. Their plan was simple: blast the bridge with as much light as possible. Our proposal used custom-engineered 54W fixtures from JUXUANLED with highly specific beam angles and advanced optics. In our simulation, we showed the client that our solution would highlight the bridge's elegant structure perfectly with no light spilling into the river or sky. Theirs created a halo of wasted light and glare. We won the project because we delivered a superior visual with almost half the power.
The Core Principle: Light Smarter, Not Harder
Think of it like this: you can use a fire hose to water a small potted plant, but you'll just make a huge mess and waste water. Or, you can use a watering can with a proper spout to deliver the water exactly where it's needed. High-quality lighting optics work like that spout. At JUXUANLED, our R&D team spends most of their time designing and perfecting the lenses and reflectors inside our fixtures. This is the real magic. Superior optics allow us to gather the light produced by the LED chip and shape it into a precise, controlled beam. This means more of the light actually hits the target surface, and less is wasted as glare or light pollution. An 18W fixture with excellent optics might put more usable light on a wall 10 meters away than a poorly designed 54W fixture. This is why investing in quality fixtures with advanced optical systems always pays off. You get a better result with lower energy consumption, which means a lower electricity bill and a more sustainable project. It's the ultimate win-win.
Conclusion
Ultimately, creating exceptional facade lighting is about precision, not just power. By scientifically matching beam angles and wattage to your specific needs, you achieve superior results with maximum efficiency.
"[PDF] Exterior Lighting for Energy Savings, Security, and Safety", https://betterbuildingssolutioncenter.energy.gov/sites/default/files/attachments/exterior_lighting_savings.pdf. Authoritative guides, such as those from the Illuminating Engineering Society (IES), provide standards and calculations for selecting appropriate beam angles and light output (lumens) to achieve desired illuminance levels on architectural surfaces while optimizing for energy efficiency and visual comfort. Evidence role: general_support; source type: institution. Supports: That effective architectural lighting involves a calculated relationship between beam angle, wattage (or lumen output), and the target surface.. Scope note: While wattage is a factor, lighting professionals primarily use lumens (light output) and luminaire efficacy (lumens per watt) for precise calculations. ↩
"041502000K10.html - ILGA.gov", https://www.ilga.gov/ftp/ILCS/Ch%200415/Act%200200/041502000K10.html. Organizations like the International Dark-Sky Association define light pollution as any adverse effect of artificial light, including sky glow and light trespass. Glare is defined by illuminating engineering standards as excessive brightness that causes visual discomfort or a reduction in visibility. Evidence role: definition; source type: institution. Supports: That light pollution and glare are formally recognized problems in exterior lighting that can be mitigated through careful design.. ↩
"Understanding LED Light Beam Angles - Ledvance", https://www.ledvance.com/en-us/professional-lighting/insights/blog/lighting-basics/light-beam-angle. Lighting design handbooks categorize beam angles (e.g., narrow spot, spot, flood) and recommend their use for specific applications, such as using narrow beams for accenting tall elements and wide beams for creating uniform washes of light on broad surfaces. Evidence role: general_support; source type: education. Supports: That specific beam angle ranges are commonly recommended for different architectural lighting techniques.. Scope note: The exact degree ranges for these categories can vary slightly between different manufacturers and design guides. ↩
"Outdoor Lighting 101: Wall Washing Vs. Wall Grazing - CAST Lighting", https://cast-lighting.com/blog/post/outdoor-lighting-101-wall-washing-vs-wall-grazing. Wall grazing is an architectural lighting technique where fixtures are placed very near a surface to direct light at a steep angle, which accentuates the material's texture through dramatic highlights and shadows. Evidence role: definition; source type: encyclopedia. Supports: That 'wall grazing' is a recognized lighting technique with a specific purpose and method.. ↩
"Global illumination", https://en.wikipedia.org/wiki/Global_illumination. Wall washing is a lighting technique that illuminates a vertical surface with uniform brightness. This method tends to conceal surface imperfections and can make a space feel larger or cleaner. It is distinct from wall grazing, which aims to highlight texture. Evidence role: definition; source type: encyclopedia. Supports: That 'wall washing' is a standard lighting technique with the goal of uniform illumination.. ↩
"[PDF] Interior LPD - | Building Energy Codes Program", https://www.energycodes.gov/sites/default/files/2021-10/Interior_Lighting_LPD_Update.pdf. The required light output (measured in lumens) for facade lighting increases with projection distance. Engineering calculations use the inverse square law and consider target illuminance (lux), beam angle, and atmospheric conditions to determine the necessary lumen package for a given height. Evidence role: mechanism; source type: paper. Supports: That there is a direct relationship between the power of a light fixture and the height it can effectively illuminate.. Scope note: Wattage is a measure of energy consumption, not brightness. The technically precise metrics for specifying light output are lumens and candelas, though higher lumen output generally requires higher wattage. ↩
"LED Lighting - Department of Energy", https://www.energy.gov/energysaver/led-lighting. According to studies by governmental bodies like the U.S. Department of Energy, replacing legacy lighting (e.g., metal halide) with high-efficiency LED systems can result in energy savings of 40-75%, especially when combined with precise optical controls and smart sensors. Evidence role: statistic; source type: government. Supports: That significant energy savings can be achieved by replacing older lighting with modern, well-designed LED systems.. Scope note: The exact savings for any given project depend on the previous system's inefficiency, local electricity costs, and the design of the new system. ↩
"Inverse Square Law for Light - HyperPhysics", http://hyperphysics.phy-astr.gsu.edu/hbase/vision/isql.html. This principle is based on physics. To maintain sufficient illuminance (lux) over a longer distance, light energy must be concentrated into a tighter beam, which increases its center beam candle power (CBCP). This requires a higher lumen output from the source, which generally corresponds to higher wattage. Evidence role: mechanism; source type: education. Supports: That projecting light over greater distances requires higher intensity, which is achieved by increasing power and narrowing the beam angle.. ↩
"Lighting Design: Techniques to Transform Interior Spaces", https://marymount.edu/blog/lighting-design-techniques-to-transform-interior-spaces/. Lighting design manuals provide surface reflectance values for various materials. For example, dark brick may have a reflectance value of 10-20%, while light concrete can be 50% or higher. To achieve the same target illuminance, a low-reflectance surface requires proportionally more incident light, which can mean increasing lumen output by 50% or more compared to a moderately reflective surface. Evidence role: statistic; source type: institution. Supports: That dark and rough materials require significantly more light than light and smooth materials to achieve the same perceived brightness.. Scope note: The exact power increase needed depends on the specific reflectance values of the materials being compared and the desired level of brightness. ↩
"asymmetric lighting VS symmetric lighting: A defective guide in 2021 -", https://brandon-lighting.com/asymmetric-lighting-vs-symmetric-lighting-a-defective-guide/. Asymmetrical optics are lenses or reflectors engineered to produce a non-uniform light distribution. In facade lighting, they are often used to direct the majority of the light away from the fixture's mounting point and up a vertical surface, creating a more even wash and preventing an overly bright 'hotspot' at the base of the wall. Evidence role: definition; source type: paper. Supports: That asymmetrical lenses are a specific technology used in lighting to control light distribution for applications like wall grazing.. ↩
"Reduce Glare & Create Controlled Lighting with Hunza® Accessories", https://hunzalighting.com/reduce-glare-create-controlled-lighting-with-hunza-accessories/. Lighting fixture accessories such as louvers (often in a honeycomb pattern), shields, and visors (also called snoots or cowls) are used to block light at high viewing angles. This mitigates direct glare for pedestrians or occupants of nearby buildings without significantly altering the intended beam on the target surface. Evidence role: general_support; source type: education. Supports: That louvers, shields, and visors are standard accessories used to control glare in lighting fixtures.. ↩